 |
Catching Light Photography by Dan Lessmann |
Oklahoma City Clear Sky Clock
Cheddar Ranch Observatory Clear Sky Clock |


![]()
![]()
![]()
![]()
![]()
![]()
|
|
|
|
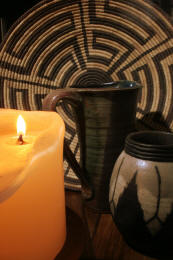
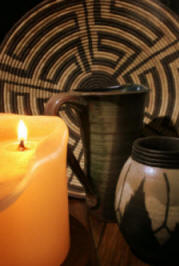
Still Life Post Processing Example
The transition from film to digital photography opens up all kinds of possibilities for enhancing an image after the shot. Every shot is of course different and requires different methods but, with some skill and knowledge, the digital darkroom allows us to turn a mediocre shot into something very different. I'm by no means an expert but here's an example of a shot that, I feel at least, was significantly improved after the shot was taken. Here is the original and the final shot side by side with the final on the right...
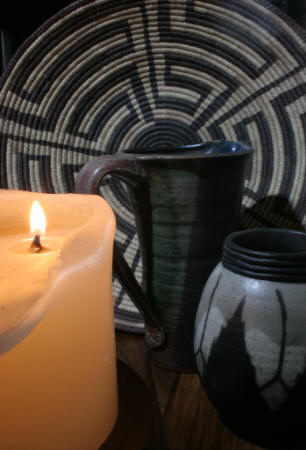

I leave it to you to judge whether or not the final version is improved but here's what I did both to shoot this image and to enhance it after the fact.
Composition and Framing
I was after a nice earthy feel in this still life with a nice collection of shapes for different focus points. I wanted a rich, warm effect in the final version with lots of depth of field. So I composed the shot with a substantial distance between the candle in the foreground, moving back at various depths of field through the pottery and finally to the basket that makes up the background. The focus point for the shot was the pitcher in the center of the frame. These objects are sitting on my dining room table which is very dark and strong grained wood.
Lighting
I wanted as much as possible to use the candle for the primary light source to capture the nice glow of the candle flame and the candle itself as a highlight of the frame but there had to be additional lighting. There is a subdued, natural light from the right in this frame that I used to highlight the curves of the partially melted candle on the right side. Then I used a very low power flash to illuminate all but the candle from the upper left on a second curtain synch (a weak flash right at the end of the exposure). I just held the flash on a cable high and left of the camera and behind the candle during the exposure.
Exposure and Aperture
I wanted the candle to be just slightly out of focus in the shot so I used aperture priority for the shot and the camera was mounted on a tripod for stability for the required half second exposure the selected aperture required. I also used a cable release just to avoid any vibrations in the shot.
The Shot
I took several bracketed exposures at various apertures and flash levels to get the balance I wanted; not in color but in illumination. The focus depth of field determined the required aperture and exposure was determined by the candle flame. I didn't want the candle flame to be totally burned out. This meant the only variable adjustment I could make was in the flash and I settled on a very weak flash really just to pop up the highlights of the pots and basket. The light from the flash is of course much whiter than the orange glow of the candle and this shows in the raw image. Not what I was looking for but that was okay as this is easily corrected. What I looked for was whether or not the highlights of the pottery and the basket were adequately illuminated with no burnout from reflections and no hard edges. I also made certain that the candle was not in the flash as I wanted it illuminated only by the candle flame itself.
Post Processing
 |
I used Photoshop Elements to post process the image and I tend to start on the big stuff then get down to the details when enhancing an image. By far, the biggest problem with this shot was the white light of the flash. I wanted a warmer, almost sepia tint to this image.
This was corrected by adding a color fill layer with a nice burnt orange in overlay mode and at a 42% opacity. This richened up the tones of the entire image and, in this case I included the candle in that adjustment to enhance and richen it's glow as well.
At this point I had the tones I was looking for but felt the shot was a bit dark. I created a levels adjustment layer and in a trial and error process, I adjusted levels by pulling the white point down just a bit and just using the histogram and candle flame as a guide for the best level. I just boosted the white levels to the point just below beginning to burn out the candle flame.
The result of these steps is shown to the left. |
 |
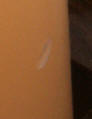
Next I looked for problems in the details of the image. There's a rather unattractive nick in the right side of the candle. There's also some background object coming through above the basket on the left corner. The clone tool took care of these easily enough. |
 |
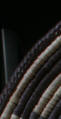
Next I wanted to boost the highlights of the pottery
and the basket. This also is easily done using the dodging tool in Photoshop. Both were done with a large fuzzy
brush and with a low exposure and on highlights only. I gave
particular attention to the details on the pitcher to boost the
interesting banding in the glaze running up the side of the pitcher.
Next I went after the candle. There was little to do here really. I simply dodged the body of the candle lightly to increase the effect of the candle flame's glow in the wax of the body to liven up that warm glow a bit. Finally I used the burn tool on the darker areas of the basket and the wood grain on the table to boost the contrast on those darker lowlights. This also was done with a large fuzzy brush and low exposure. I've learned that dodging and burning are best done slowly and carefully as it's quite easy to overdo the process resulting in hard edges and other artifacts that detract from the image giving it a plastic look. Never say never but the truth is I never dodge or burn anything at over about a 12% exposure and usually something closer to 5% is more appropriate. Compare the image on the left to the one above after applying the color fill layer. Note the difference in contrast of the highlights. That's what dodging and burning did and it livens up the image nicely. And that produced the final image. Using a darkroom to enhance what is otherwise a mediocre and imbalanced image is not new of course. It's been done for years in darkrooms all over the world. But the advent of the digital darkroom opens this world to us all and we don't have to turn the walk in closet into a darkroom in the process. |
Last Updated: 11/12/2014 - Copyright © 2004-2013 by Dan Lessmann. All rights reserved. Please click here for my usage policy.
|
Last Updated: 04/29/2021 - Copyright © 2004-2013 by Dan Lessmann. All rights reserved. Please click here for my usage policy. |