 |
Catching Light Photography by Dan Lessmann |
Oklahoma City Clear Sky Clock
Cheddar Ranch Observatory Clear Sky Clock |


![]()
![]()
![]()
![]()
![]()
![]()
|
|
|
|
Enhancing M42's Core
This is a study on using Photoshop to enhance the core region of images of M42. The problem is that the central core of this nebula around the Trapezium is much brighter than the surrounding nebulosity so images that are long enough to capture the dimmer outer shells of gas invariably result in core burnout where none of the detail can be seen around the Trapezium. Other objects also have a large difference in brightness and this same technique can be used on them as well.
The method I used to enhance the core was developed by Jerry Lodriguss. Details on this method can be found at http://www.astropix.com/HTML/J_DIGIT/COMP2.HTM. This method uses a feathered selection common to both a long exposure showing the outer shell details and a shorter exposure showing the core's details.
There is an alternative method, also developed by Jerry that can be found here http://www.astropix.com/HTML/J_DIGIT/LAYMASK.HTM. This method utilizes a blurred mask of the core area rather than a feathered selection. It has the advantage of being a bit more versatile in the blending after the fact while the first method is a bit simpler in the execution. (Or at least I think so.)
Either method will produce similar results but a discussion came up on a Yahoo board regarding how best to blend the detailed core with the burned out core to produce a nice transition between the two. It's quite easy to leave artifacts between the boundaries of the two areas. That issue is what this page addresses.
You might wish to review Jerry's first method to understand what I did in this process but essentially an image showing the core was combined with an image showing the outer shells. The secret to success of either method is what is included in the shorter exposure or the mask.
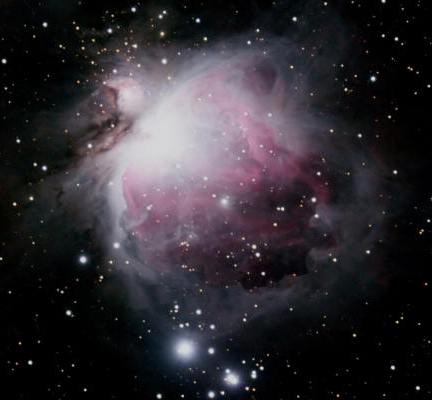 |
Here is the original shot of the
main nebula illustrating the problem with core burn out.
The outer wisps of nebulosity are nicely exposed in this frame but the core is obviously very burned out with virtually no indication of the stars of the Trapezium. Even M43's core is substantially burned out and this image does not in fact show that much of the outer shells of gas. In other words, additional frames stacked with this image while enhancing the outer gas shells would result in even greater burn out of the core region. This particular image is a stack of 18, 3 minute frames and even a single raw frame of this exposure length begins to burn out the core. So the trick is to take a variety of exposure lengths; some that are longer and show the outer shell detail well and some that are shorter and show the inner core detail well. This original image is the image I used to show the outer shells. |
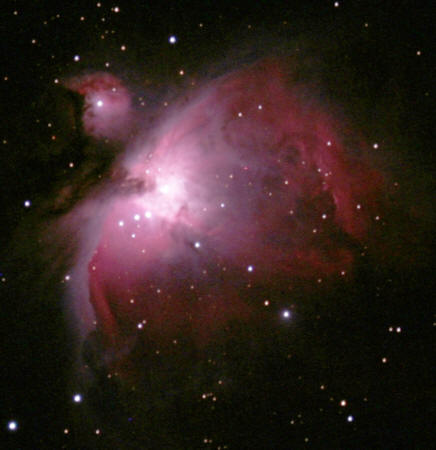 |
Here is the final image I used to act as the core mask
showing the details of the core. I aligned and
combined 5, 10 second shots and 3, 20 second shots to create this image. My first attempt at blending this mask into the original was not successful. I didn't have the levels pushed high enough to show enough detail of the core and it's surrounding gasses. This created a dark halo around the core when I combined the two images with the feathering value I used (100 pixels). I had three options: I could restrict the selection to only the very brightest areas of the core. That reduced the selection size and allowed me to keep a larger feather value but a lighter halo from the original shot then showed through the mask. I could reduce the feathering amount to exclude more of the core shot. I tried reducing the feather to 50 pixels and that worked well to eliminate the halo but began to show a hard edge between the two shots. This last condition is what brought this issue up for discussion on the board and was not what I wanted. That brought me to my last option. I adjusted the core mask by increasing its brightness and contrast slightly. In trying the other options I came to realize (rather obviously in hindsight) that my goal was to balance the core shot such that the areas that would be feathered would more or less match the same areas of the original in both brightness and tone. This image is the result of that adjustment. |
 |
This image shows the mask used in the final
shot. This is a feathered selection (back up at 100 pixels) of the
core image above using the Magic Wand select tool on the burned core area in
the original to define the boundaries of the saved selection. I looked for three things in this image. First, is the detail of the Trapezium showing up as I would like? Second, is the tonality and brightness at the feathered edges more or less a match of the corresponding areas in the original? Third is the feathered transition very smooth and wide with no hard edges anywhere? I adjusted and tweaked the core mask image until these questions were satisfied. More or less anyway. In actuality the first question would be better served by spending a bit more time on selecting and compositing images that reveal the area around the Trapezium better. But, for this study, I direct your attention to the blend boundaries. The slow change from the core to the original through a large feather and the similarity in brightness and tone in those same areas is what will insure that the blend is smooth and invisible and that's the critical aspect of using this technique even at the cost of some remaining burnout in the core. |
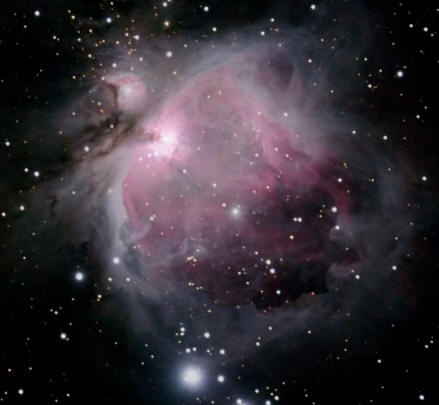 |
Here is the result of the mask application and this was more or less what I was looking for. The Trapezium stars are now visible as is the core star of M43 and, most importantly, the transition between the mask and the original is smooth and effectively invisible. |
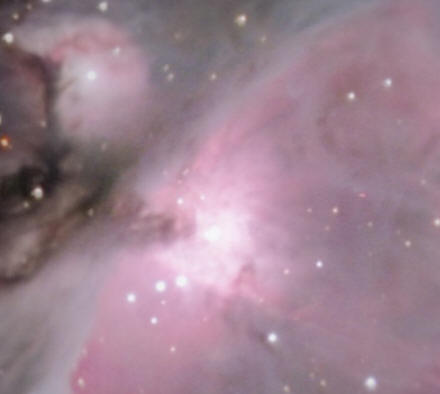 |
Here's a close up of the core area of the final result. This
includes the feather between the two images. There's still a bit
of burn out right in the Trapezium but this is a much improved view of
the core region with no obvious artifacts on the boundaries between the
original and the mask. So a large feather (or blur if using the second method) and attention to the transitional areas between the two images is required for this method to work well. The areas of the two images that will be included in the blended regions must be more or less the same tone and brightness so that the transition is natural and invisible. In this particular case, I could repeat this process using even shorter exposures or fewer frames to create a second, smaller mask that would eliminate the last of the burn out in the core. Or I could use the same mask but with lower levels and feather the smaller selection with a smaller feather value for the second mask. This method can be repeated as many times as necessary to even out the illumination across the entire frame. |
Last Updated: 11/12/2014 - Copyright © 2004-2013 by Dan Lessmann. All rights reserved. Please click here for my usage policy.
|
Last Updated: 04/29/2021 - Copyright © 2004-2013 by Dan Lessmann. All rights reserved. Please click here for my usage policy. |