|
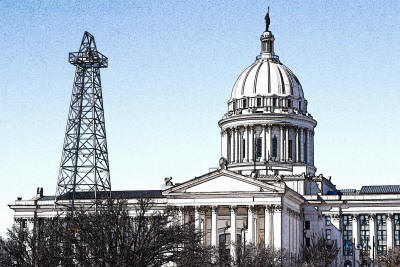
State Capital Line Art
These shots were taken at the Oklahoma State
Capital. As I was processing the first of the shots I found myself
playing around with the Photoshop find edges filter and liked the effect so
much that I did the entire series as line art. I must make a trip back
to the capital to shoot interiors as well. Click the image below to enter this
gallery. Details on the techniques used to create this effect are
below.
Technique Used to Create
this Effect
This technique is a lot of fun and lends
itself well to images that have hard edges and high contrast.
Typically that means architectural shots but this method can also work on
some landscape shots where there is strong contrast and hard edges in the
frame. So, as with most techniques, this technique begins in the field
when shooting.
I look for good side lighting compositions
for shadows and contrasts if I intend to use this technique this most
especially with landscape shots that tend to be flat with an overhead light
source. Of course one would normally do this and in the case of this
series, I was not specifically shooting for a line art composition. I
just noticed that this series would lend itself well to this technique after
the field shoot. In this case, these shots were intentionally done in
late afternoon to capture some nice shadows and shading as is normally
desired.
However there are some other considerations that are best
addressed in the field for this technique.
You'll want to set a very low ISO to reduce noise in the
frame. Noise will manifest itself as grain using this technique
and it can become overpowering if there is a lot of noise as is inherent
with higher ISO settings. And anything but sharp and deep focus will
not provide the hard edges throughout the frame that are needed for this
technique so slow apertures for deep fields of focus are needed.
In this case all of these images were shot at ISO 100 in
RAW mode and off of a tripod due to the longer exposures required at that
low ISO and small apertures. After the shoot, all of the
processing used to create the line art effect was done within Photoshop CS2.
This can also be done with PS Elements.
The
post processing steps are outlined below.
|

|
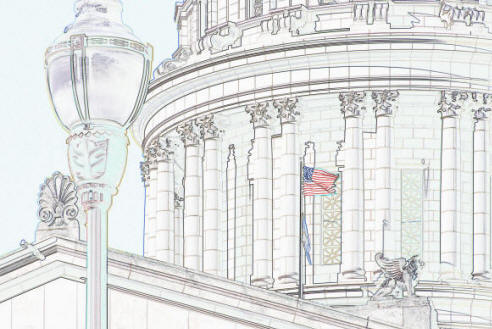
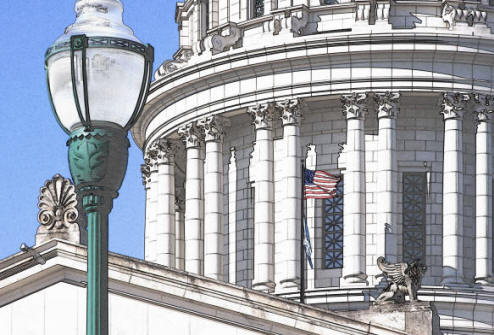
We start with a photograph of course. In this case, we'll
use the one to the left. First things first.
There are some unsightly blemishes and dust motes and the left
side of the photograph is slightly skewed to the right due to lens
distortion. Though not obvious here, there are also some lightning rods that are best
cloned out as these, having hard edges, are enhanced by these
techniques.
All of this cleanup and retouching should be done before
proceeding with the remainder of the technique. These
retouching techniques are done with pretty much all shots of course
but are especially important for this technique because these
blemishes are enhanced in later steps. |
|

|
After some retouching, some rotation and transforming to clean up
the skewed verticals and a bit of cropping to better position the
subjects, we have the background layer needed for the remaining
processing. |
 |
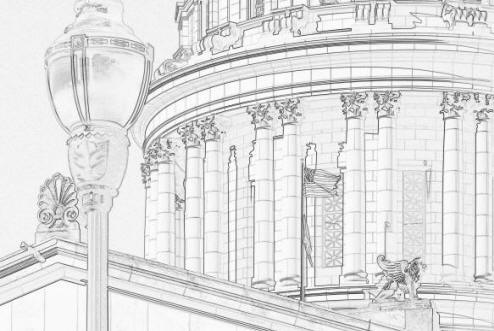
The next step is to let Photoshop find the edges within the
image.
Make a copy of the background layer and then use the
Find Edges filter in the Filter/Stylize menu or the Photocopy filter
for harder edges with less detail. I'll assume you're using
the find edges filter as we continue as this is the more complex
method.
As you can see in the image
to the left, since this is a color photograph the edges will be
color as well. We don't want that since we're trying to create
an effect of a tinted pen and ink or pencil drawing.
We'll take care of that in the next step but you can see already
the line art effect that we are looking for. I might also add
that you can stop right here if you like. With some additional
work, an image like this
can be used as a nice watermark effect background for other projects
such as a webpage for example.
Please note! If you intend to continue with this technique,
this edge extraction is done on a copy of the original layer.
For the full technique, we want to retain the original layer as is
because it will be used to color tint the line art in later steps.
If your line art effect is a bit washed out and fuzzy, go back to
the original and apply an unsharp mask to harden up the edges a bit.
Then recreate the edge extraction layer. That was not needed
or done with this example. |
|
|
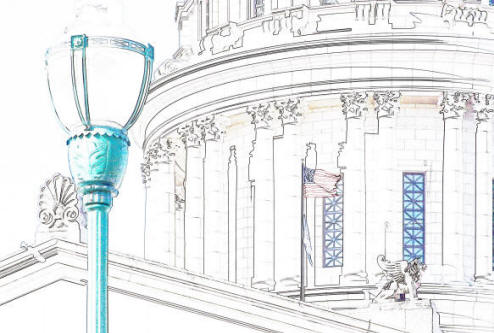
The next step is to remove all color from the line art. I
do this by copying the line art layer to a new image then creating a
color/saturation adjustment layer in this new image and dropping the saturation
down to -100. This removes all color from the image as shown to
the left. You can do this without creating a new image but I
always do because I usually find I want to keep this grayscale line
art as its own image. I might also do a bit of curves and levels adjustment if
I feel it's needed; this to increase the contrast of some of the
edges. But one needs to be careful with this. Large
areas of one color, such as the area of sky in this photograph will
become quite grainy with too much contrast and it's difficult to
adjust one feature without blowing out the contrast of another when
using adjustment layers. This can add to
the line art effect but, if taken to far, it can detract from the
subject rather badly.
You can of course mask out or
blur the grainy sky or other blown out feature but a better way is
to dodge and/or burn selected features of
the image to increase the contrast as needed.
This is also the place to look for any additional cleanup that
needs to be done to the original photograph, such as eliminating
those lightning rods or perhaps some dust motes that are popping up
here but not obvious in the original photograph. If needed, go back to the background layer and
clean them up there then recreate the edge extraction layer. |
|

|
Next the now grayscale line art image is flattened and copied
back into the original image as a new layer. The original color
edge extraction layer is deleted as it is no longer needed and the layering mode on
the line art is changed to Overlay. Other blending methods can
also be used but Overlay is the one I use as that mode is needed for
further steps.
The image on the left shows this effect. All of the color
you see in this frame is from the original background layer acting
as the tint for the grayscale line art.
Note that the overall brightness of the image is too intense due
to the Overlay mode. This comes from the overlay of the
predominantly white background of the line art layer.
Also note that there's not quite enough line art effect.
That is, the original color photograph is overpowering the
line art layer. You can, if you wish apply a slight blur to
the color layer before pasting in the line art to reduce this
somewhat. |
|
|
But there's a better way. To bring the line art back out create multiple copies of the
line art layer all in Overlay mode. This increases the
dominance of the line art taking care of the overpowering color
tinting.
The image is even more washed out with these additional
layers in Overlay mode of course but note how the line art once
again becomes the dominant component of the image. That's what
we're after in this step.
In this case there are three copies of the line art layer for a
total of four layers all in Overlay mode. |
|
|
The final step is a fine tuning step using adjustment layers
applied to the original background layer and this is actually done
in conjunction with the creation of the overlay copies of the line
art layer.
What we're after is a balance between the color
tinting from the background and the texture provided by the overlaid
line art layers.
Typical adjustments to the background layer are
to reduce the color lightness with a color/saturation adjustment
layer and perhaps curves and levels adjustment layers to boost
contrast even more. In this case, all three were used
but this varies from image to image.
Copy the line art layer as needed to enhance the line art effect
and use the adjustment layers on the background to bring the washed
out color back up and the brightness down for each copy you make
watching for the balance between texture and color that you are after.
The final step, in this case, was to reduce the opacity of the
final copy of the line art to about 30%. So there are 3
1/3 line art layers balanced against the color tint of the original
background layer and its associated adjustment layers.
This too
will vary of course. Just balance to taste and according to the requirements of the
image. |
|
|
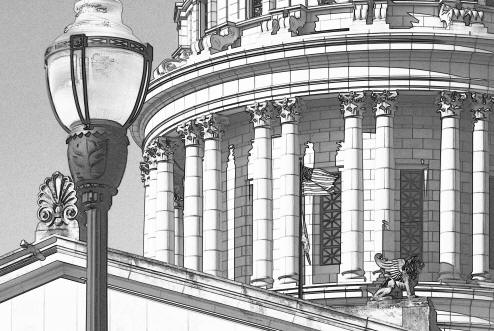
There are other possibilities using this technique of course.
You might choose for instance to present the subject in a grayscale
format... |
|
|
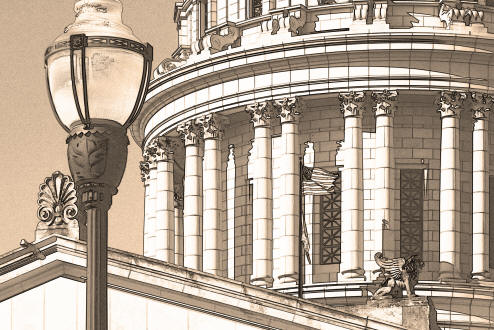
Or perhaps your subject lends itself well to a sepia tint.
There are many possible avenues one can follow beyond this basic
technique to create all sorts of interesting images.
And of course there are many, many other Photoshop filters that
open up artistic possibilities beyond this particular technique.
Playing around in the digital darkroom is a lot of fun and can
enhance your photography beyond what the camera captures.
So give it a try and see what you can come up with! |
|


